Do you run an eCommence store and use Facebook to serve products ads to your audience?
If so, I’m guessing you use the send people to your website or increase conversions on your website objective.
While both are great ways to reach your marketing goals, dynamic product ads are arguably the best way to serve highly targeted product ads to your audience.
What are Dynamic Product Ads?
First let’s address the problem.
Businesses with large item inventories are not able to show the right product to the right person without spending hundreds of hours setting up individual product ads. For example, if your store contains over 5,000 products, it’s not feasible to create 5,000 ads and custom audiences showing each product to the right person.
Dynamic product ads are the newest ad solution that help businesses show multiple products without having to setup hundreds of campaigns. Advertisers can upload entire product catalogs and create a few campaigns serving audiences specific products.
Every dynamic product ad can be customized at various levels of the buying journey.
How do you create dynamic product ads?
Step 1: Create a Facebook business manager account
To run dynamic product ads you must have a Facebook business manager account (you can signup here).
You need a business manager account to upload your product catalog (discussed later).
Step 2: Creating your product catalog
Chances are your ecommerce system doesn’t have an option to automatically export your items into a dynamic product ads .csv file. This means you have to manually create an .csv file, but don’t worry it’s pretty easy to do.
Your catalog sheet must include the following fields:
ID – a unique identifier code which is limited to 100 characters.
Availability – this field must contain either: in stock, out of stock, preorder or available.
Condition – this field must contain either: new, refurbished or used.
Description – 5,000 character limit for the description of your product.
Image_link – a URL link to the image of the product. The URL can only be 100 characters long.
Link – a URL that redirects the user to your store for that item. The URL can only be 100 characters long.
Title – the name of the product. 100 character limit.
Price – cost of the item. This field must be filled in the following format: 19.99 USD.
Gtin – global trade number. You must choose between: UPC, EAN, JAN and ISBN.
Mpn – manufacture number of the item. 70 character limit.
Brand – the name of the product’s brand. 70 character limit.
All the fields above are mandatory for your catalog (for Gtin, Mpn and Brand, you only need to include at least one of these three fields). If you want to add further fields you can learn more about them here.
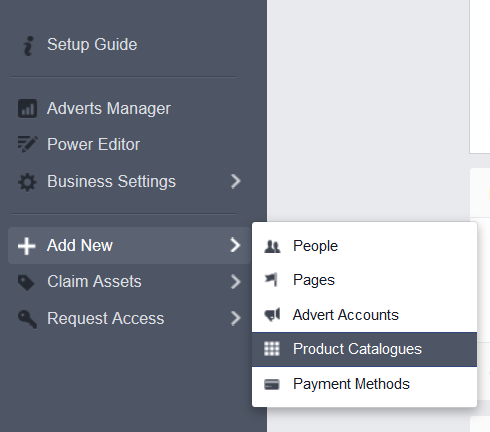
To add your catalog to your business manager account, login to your business manager dashboard and find Add New and choose Product Catalog:
From here simply follow the instructions to upload your file.
Step 3: Setting up custom pixels
Okay, so you’ve setup your business manager account and uploaded your catalog. Next is to setup a custom audience pixel.
A custom audience pixel is the tool that will gather data on your visitors which you can use to serve the appropriate products based on the items they viewed.
Every dynamic product ad must have 3 mandatory pixel events, they are:
- ViewContent
- AddToCart
- Purchase
These pixels provide Facebook with data on where they are in their buying journey and which ads to serve them. For example, if a user has activated a ViewContent pixel, Facebook knows they are at the start, if they’ve added an item to their cart but not checked out, they are halfway to becoming a customer. Finally, if they have checked out they are customers and ready to be up- or cross-sold.
ViewContent pixel – this should be added on a specific product page.
AddToCart– if you have a dedicated (unique URL) checkout page you can place the pixel there. If your store uses a dynamic add to cart page that shows up on the same page as the ViewContent pixel, then you must setup JavaScript or AJAX code to activate it.
Purchase – is added to the thank you or order conformation page.
You can learn more about adding pixels to your website by reading the Facebook Pixel Implementation Guide, or you can get in touch with us should you need more assistance.
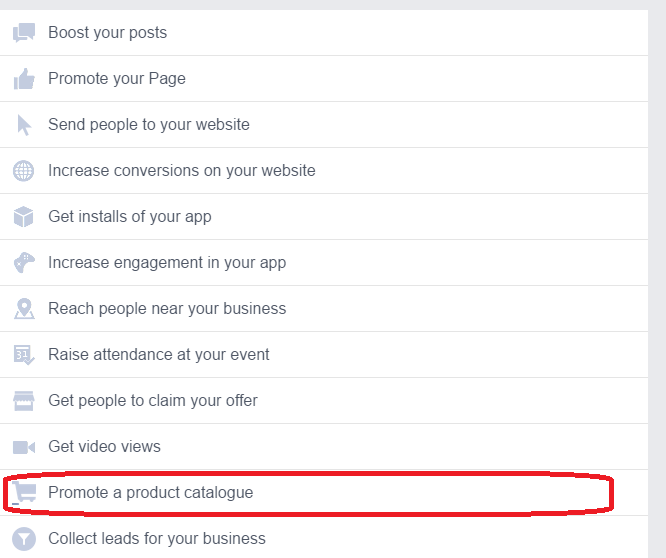
4: Create Dynamic Ads using the Power Editor
Once you’ve setup the background data and pixels, to create a dynamic product ad you have to go through the Power Editor. Start by setting up a new campaign and select the Promote a product catalogue objective:
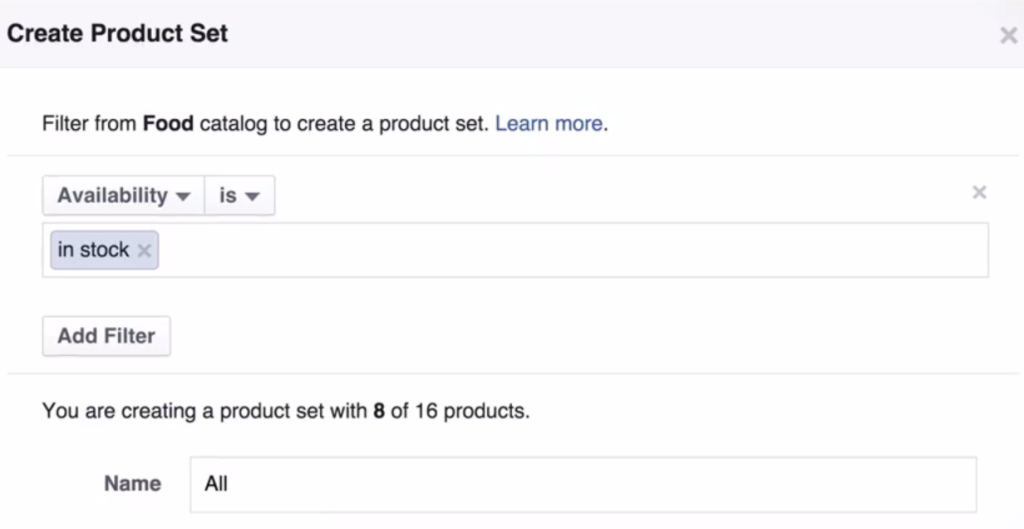
At the ad-set level you’ll need to create a Product Set which will be a collection of items from your catalog. You can create a Product Set based on category, price, product type, brand or availability:
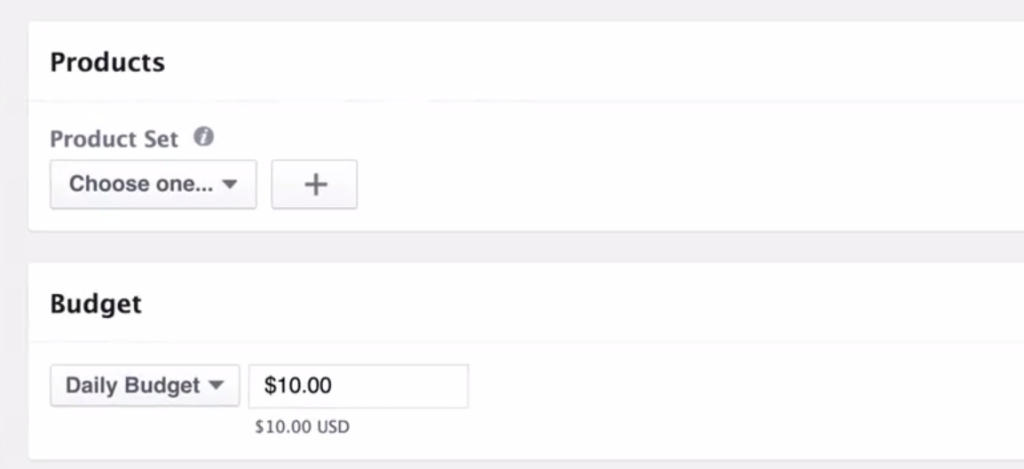
For example, you can set up a Product Set which shows all products that are in stock and cost more than $9.99:
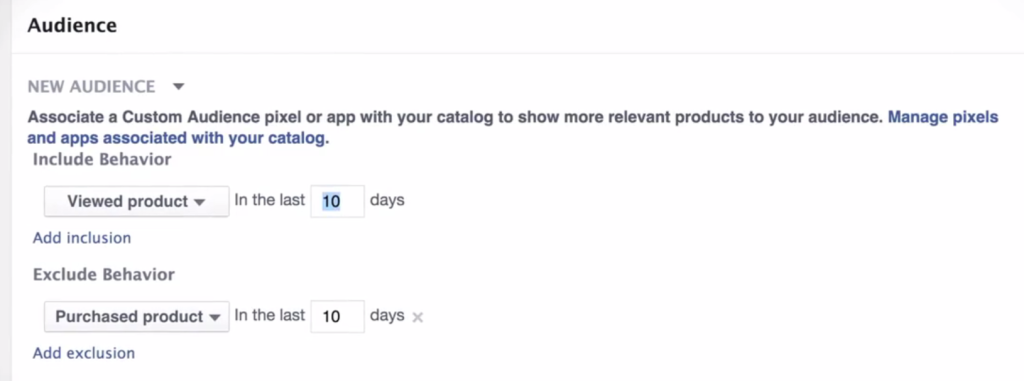
Along with the usual targeting options, dynamic product ads allow you to setup frequency caps. For example, you can choose to show your dynamic product ads to anyone who has visited that product within the last 10 days:
The final step is to create the ad. Much like other Facebook ads, there’s an option to add text, headline, newsfeed link description and a call-to-action.
However, you won’t be able to manually type text into any of the fields yourself, instead you’ll have the choice to select fields from your catalog file which Facebook uses to populate your ad:

Once you’re happy with your ad, be sure to select the option to track your conversions and upload your changes.
Summary
Dynamic product ads on Facebook is without question the most difficult campaign type to setup, but if done right, the juice is certainly worth the squeeze.
Dynamic product ads are best suited for businesses who receive healthy website traffic, have hundreds of products but don’t have a scalable or profitable way to serve the right products to the right people.
Not everybody who visits your website the first time is ready to buy, they may need a day or so to think it over. Dynamic product ads are a great way to re-engage with this audience to increase your bottom line.